
Free Wi-Fi that admits anyone who registers works well for a coffee shop or retail location where open access is the point. It’s less suitable for a university residence that should only let enrolled students on, a corporate campus that needs to verify who joins the network, or a managed hotspot where some users register multiple times with disposable phone numbers to get around voucher limits.
Powerlynx Access Control gives operators explicit control over who gets online. You can set an access policy for the whole system, override it at individual locations, and write rules that automatically accept, hold, or refuse users based on their phone number, device, or stored attributes. For cases that require human judgment, a manual approval queue lets administrators review each registration before granting access.
What Access Control does
The feature lives under Customers → Access control and has two tabs. The Settings tab is where you define what happens: you choose who gets in, who gets held for review, and who gets refused. The Approvals tab is where you work through the users waiting for a decision.
Every access decision falls into one of three categories:
- Accept – the user gets online automatically, as with an open network;
- Verify – the user completes registration, then waits for an administrator to approve them;
- Reject – the user is refused and no record is saved.
You can set this policy for the whole system and then override it for specific locations. A university might require approval everywhere, but exempt one branch campus with a Verify policy by setting that location to Accept. An ISP running hotspots across several neighborhoods might leave most locations open but set Verify at a specific venue that’s seen irregular activity.
Access Control in action
Before diving into the configuration, here’s a quick look at how Access Control works in Powerlynx – managing who connects, reviewing approval requests, and controlling access across your locations.
Setting up Access Control in Powerlynx
The steps below walk through the full configuration, from the default policy down to individual customer decisions. You don’t need to use every setting – start with what your situation requires.
Step 1. Choose where the policy applies
Open Customers → Access control and stay on the Settings tab. The Settings for selector at the top determines what you’re configuring. Select Default (system-wide) to set a policy that applies across all locations, or pick a specific location to configure that site independently.
The rules table below the selector always belongs to whichever scope you’ve selected. A system-wide policy is the starting point; location-level settings override it at that site only.
Step 2. Configure the Default rule
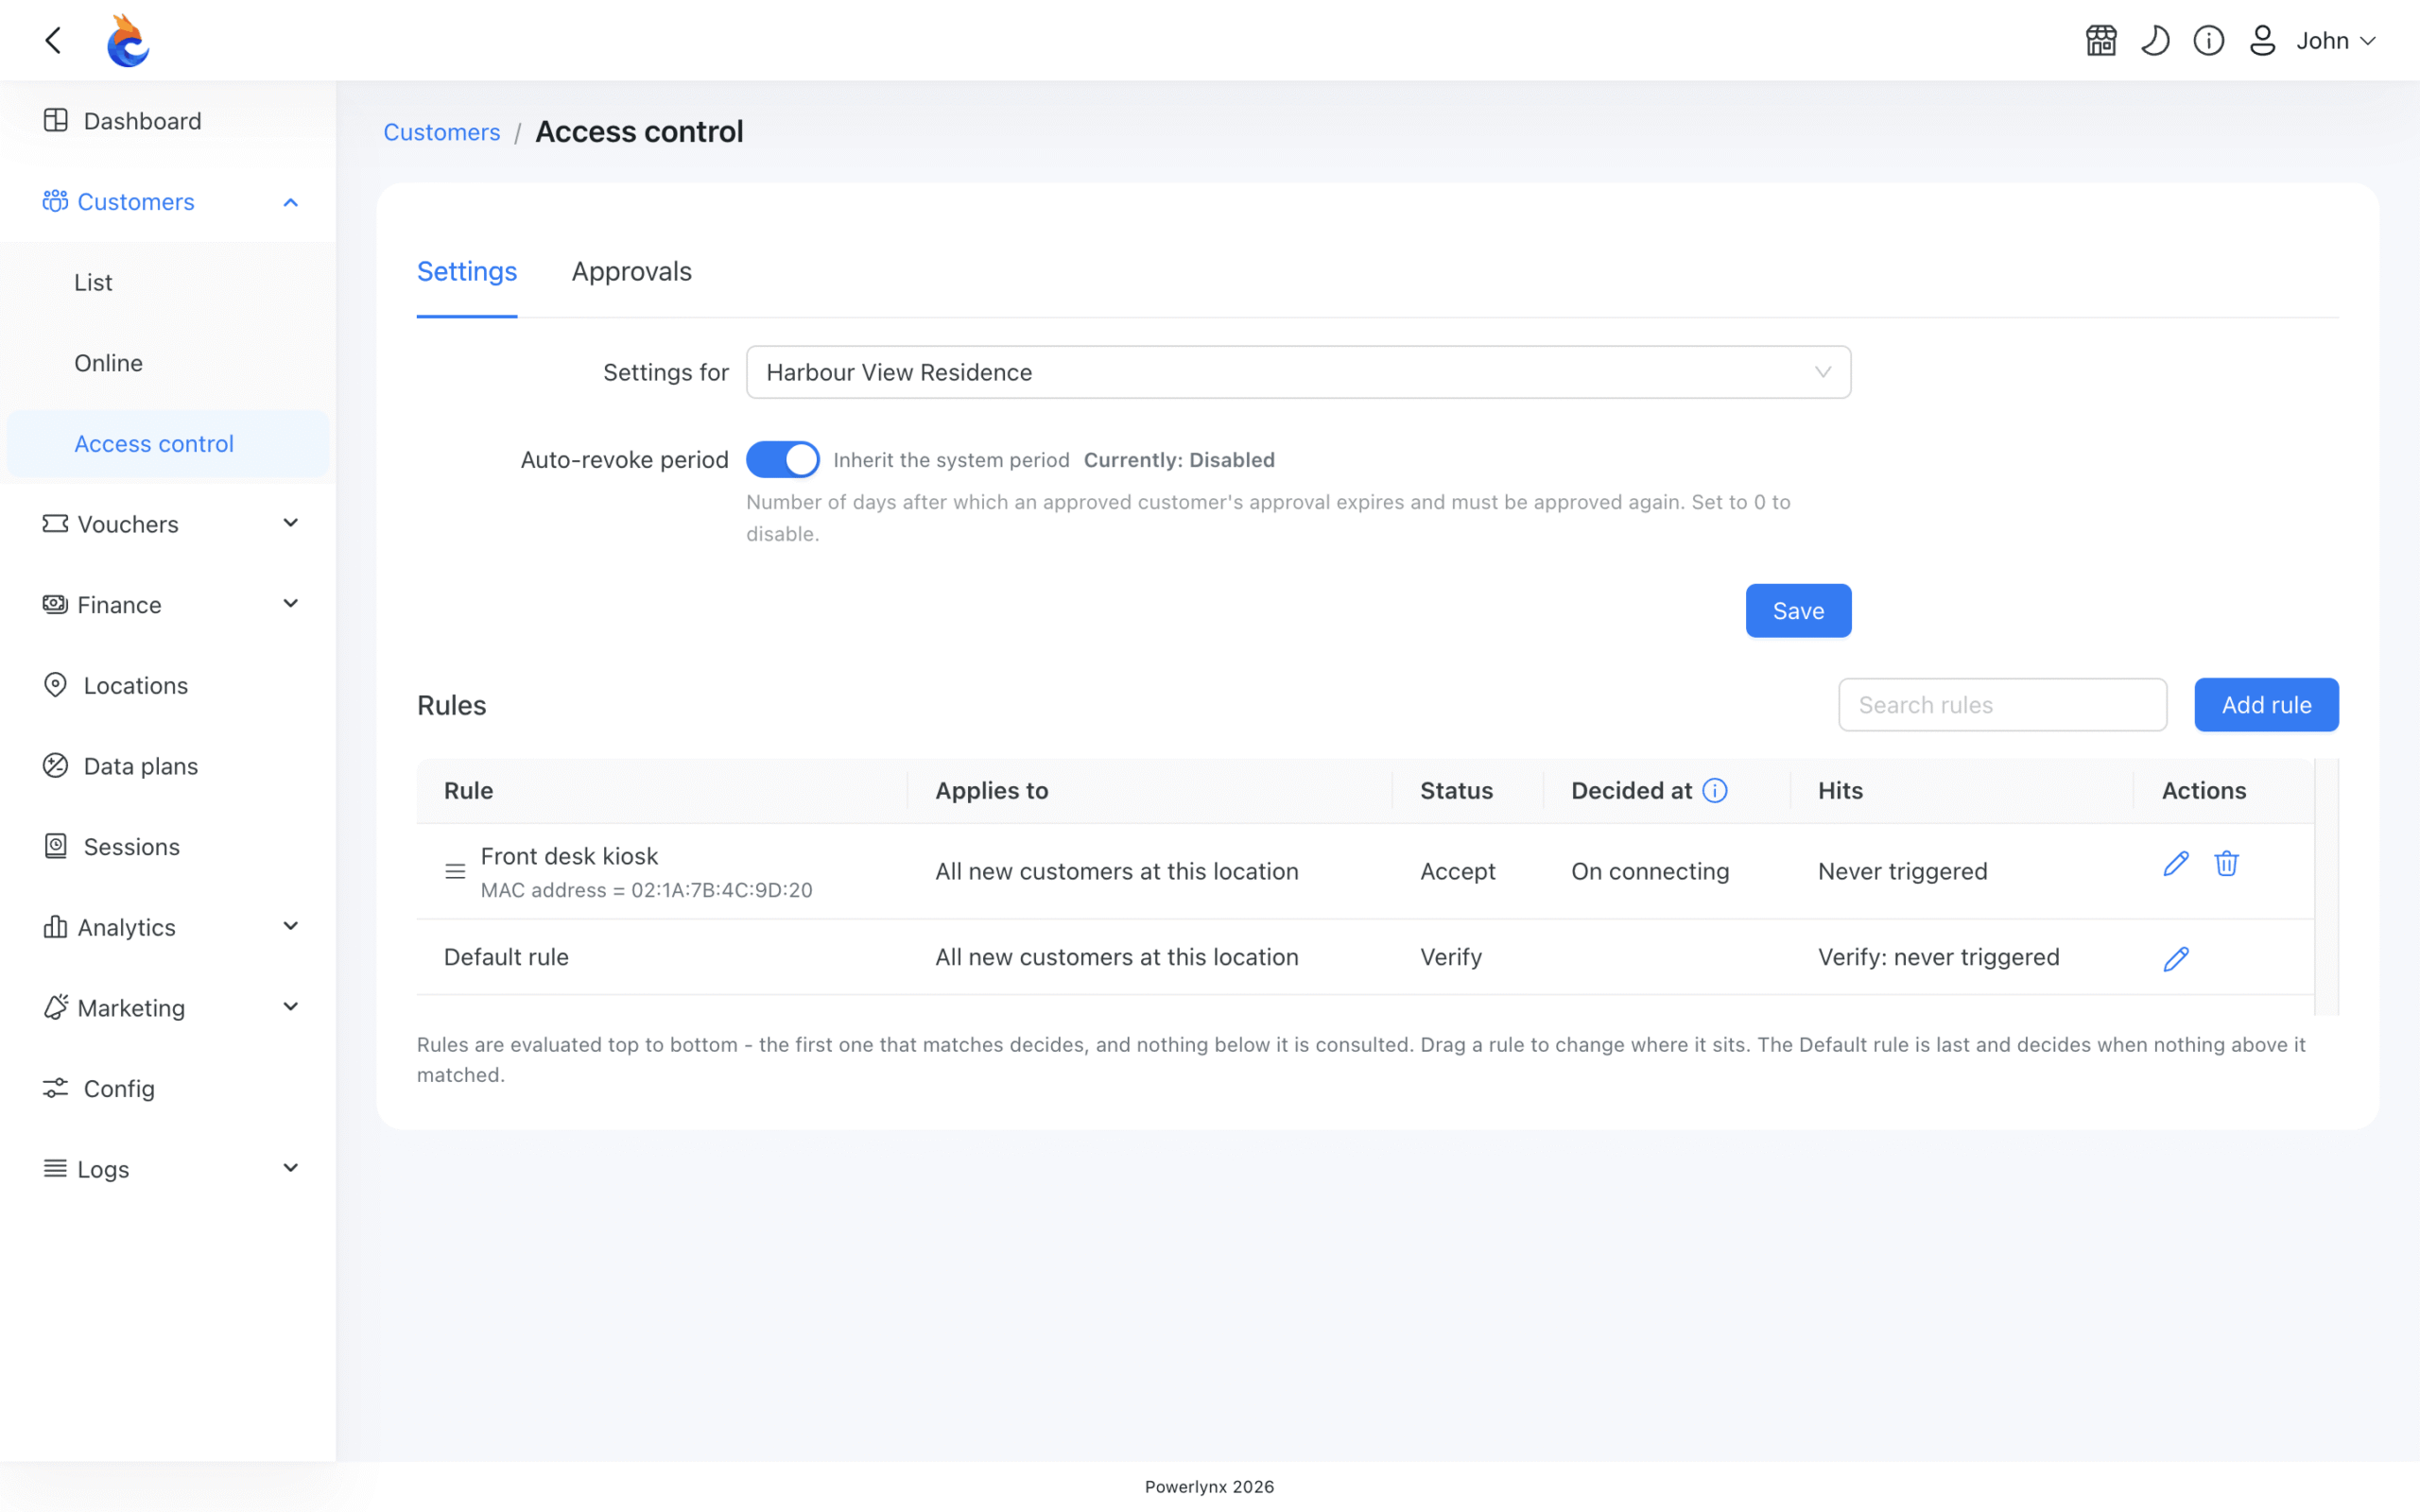
Every rules table ends with a Default rule row. This decides what happens to any user who didn’t match any access rule above it. For a system-wide setting, you can choose Accept (the initial default), Verify, or Reject.
For a location-specific setting, there is a fourth option: Inherit, which follows whatever the system-wide rule currently is. The screen shows what’s being inherited, so there’s no guesswork involved. Set the location to Verify or Reject to override the system for that site specifically.
Warning: Setting the Default rule to Reject refuses every user who isn’t caught by a rule above it – at the system level, that means everyone. Powerlynx asks you to confirm before saving this. A system-wide Reject rule with no conditions includes you, if you connect through the portal.
If you’re switching from an open network to Verify, note that users who are already online at that moment are not disconnected. The policy applies from their next login.
Step 3. Create access rules
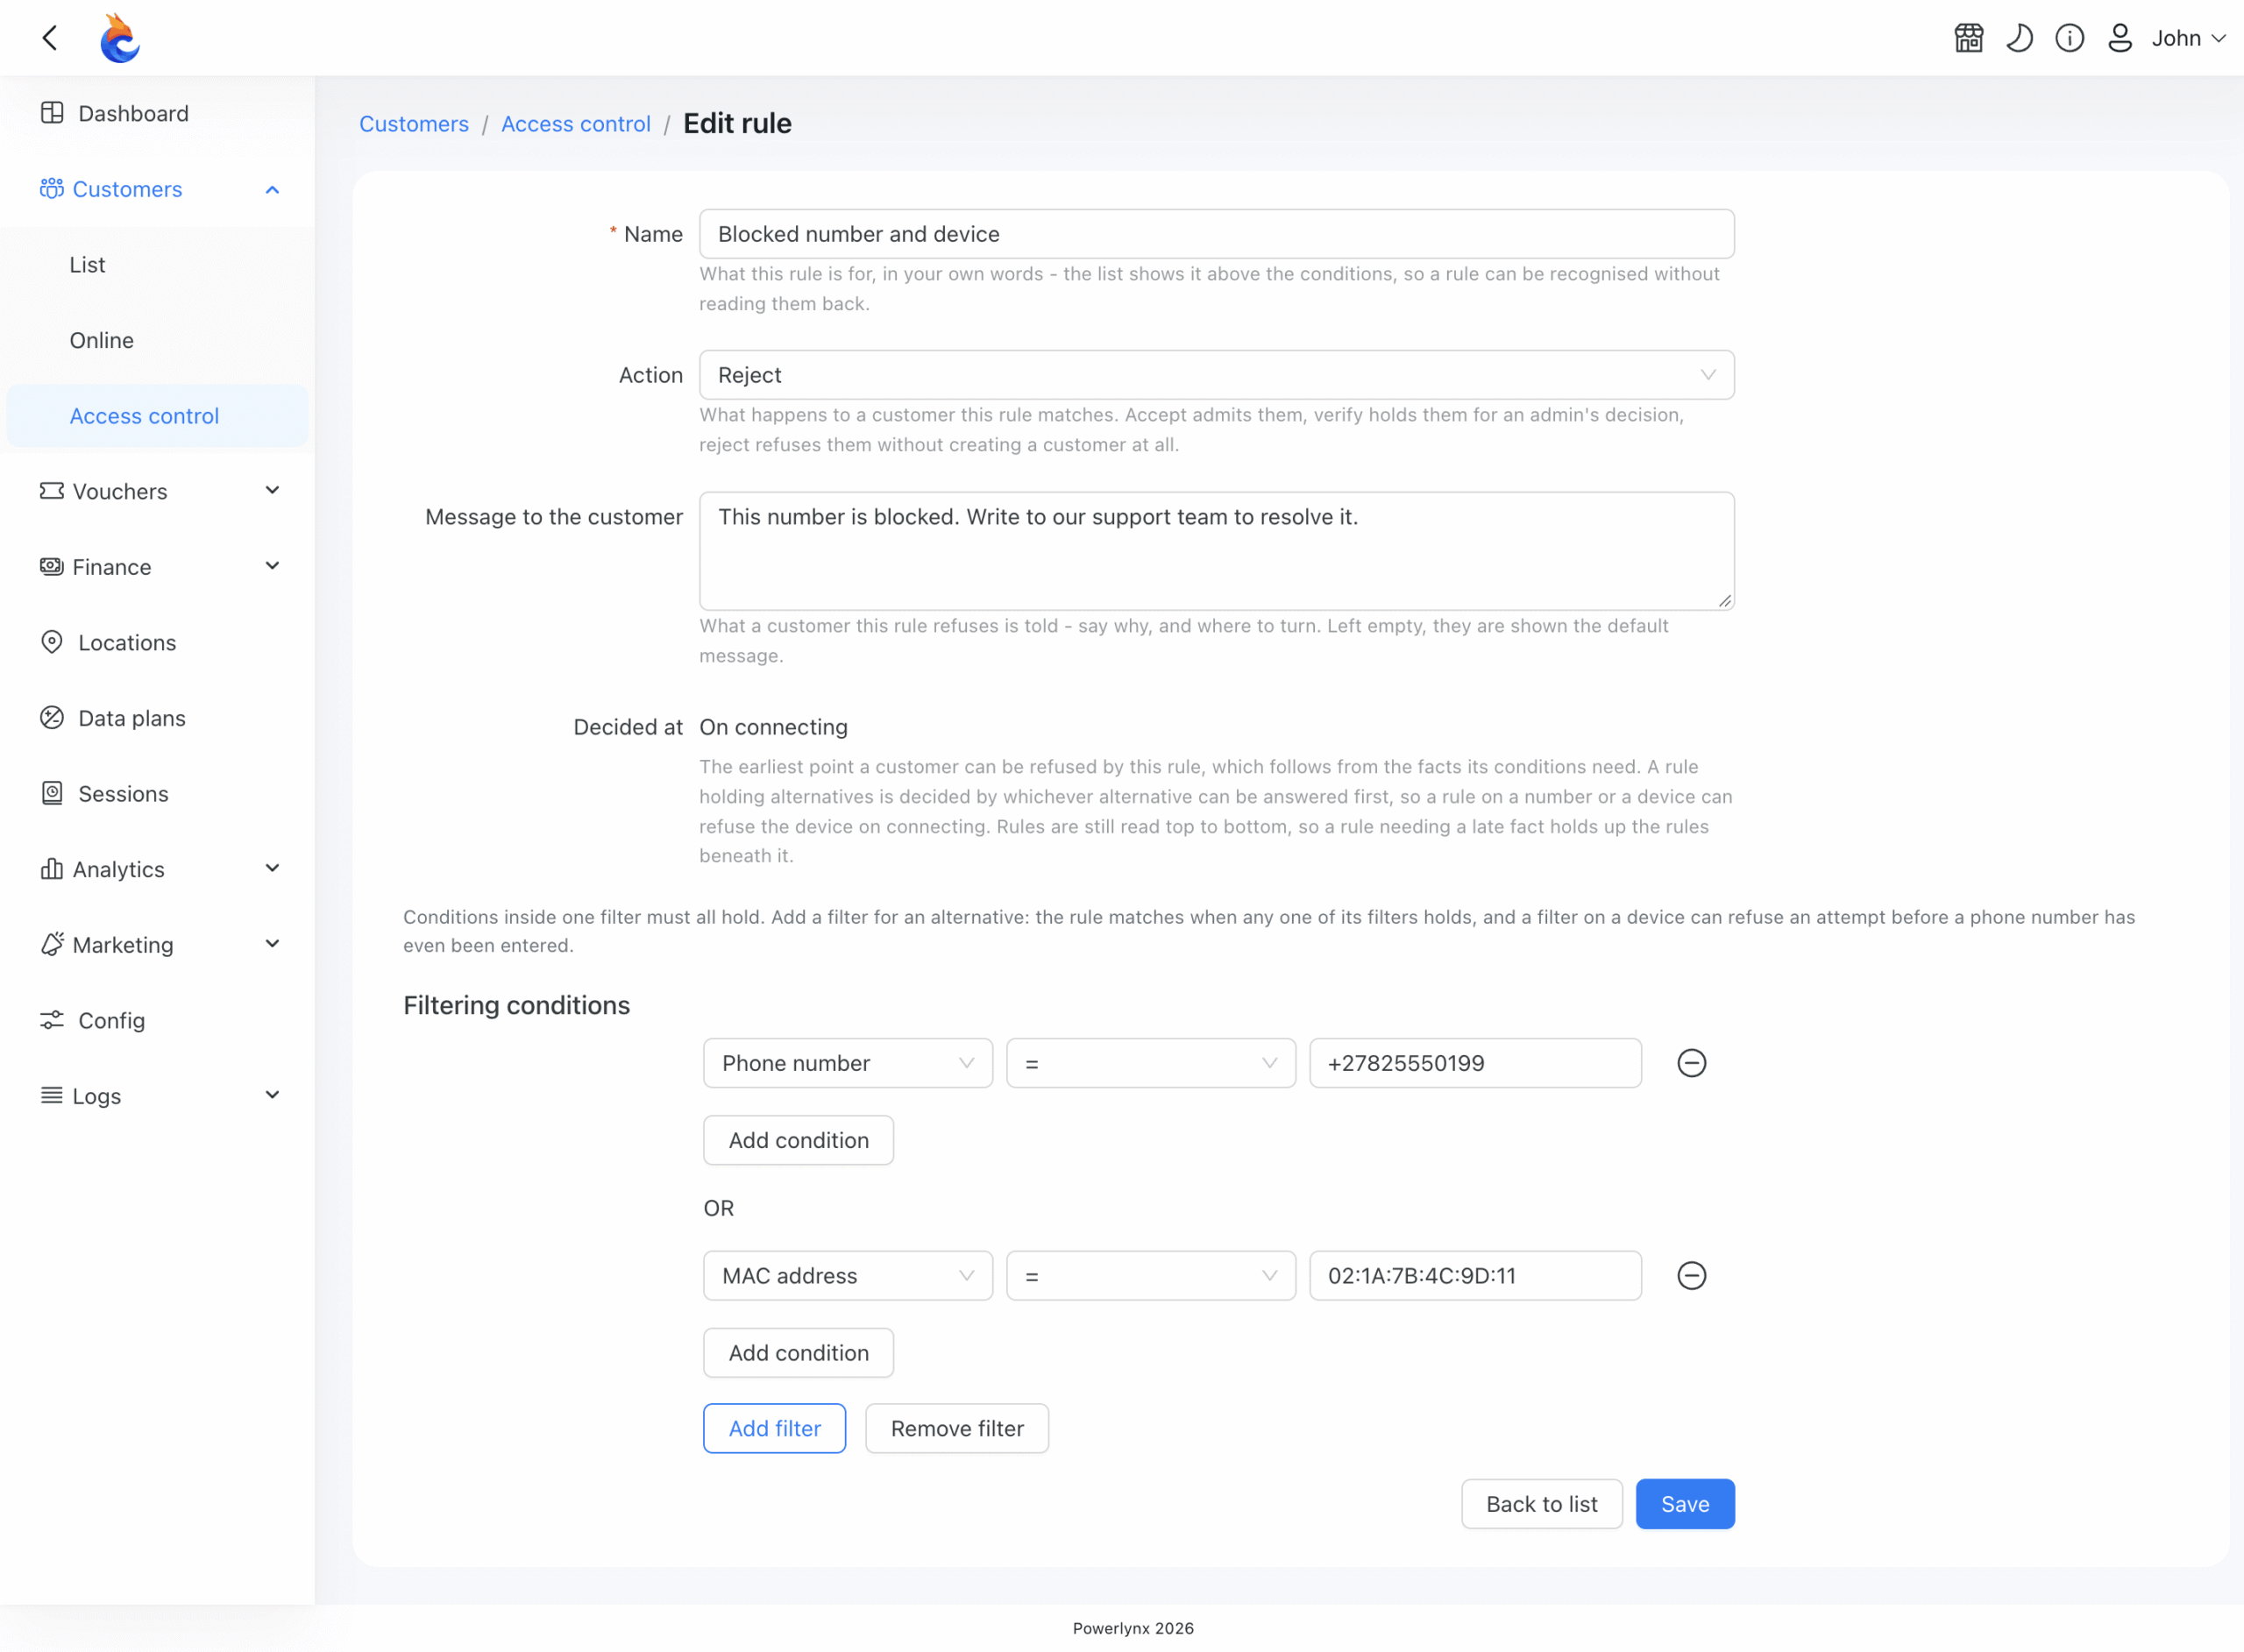
Access rules sit above the Default rule and apply a specific action to users who match their conditions. Click Add rule to open the form. Each rule has:
- Name — a label you’ll see in the rules list. Use something descriptive.
- Conditions — what the rule matches. Rules can match on the phone number the customer enters, the device fingerprint, the device info (how the device describes itself), the MAC address, or the customer’s own fields, labels, and additional fields.
- Action — Accept, Verify, or Reject.
- Message to the customer (Reject only) — what a refused user sees. Leave it empty to show the default message. If you fill it in, be specific: say why access was refused and where the user can turn.
Within a single filter, all conditions must hold (AND logic). Add another filter for an alternative: the rule matches when any one filter holds (OR logic).
Tip: You don’t need to guess device values. A customer’s Associated devices table shows the MAC address, Device info, and Device fingerprint for each linked device, so you can copy exact values directly into a rule.
Step 4. Understand rule order
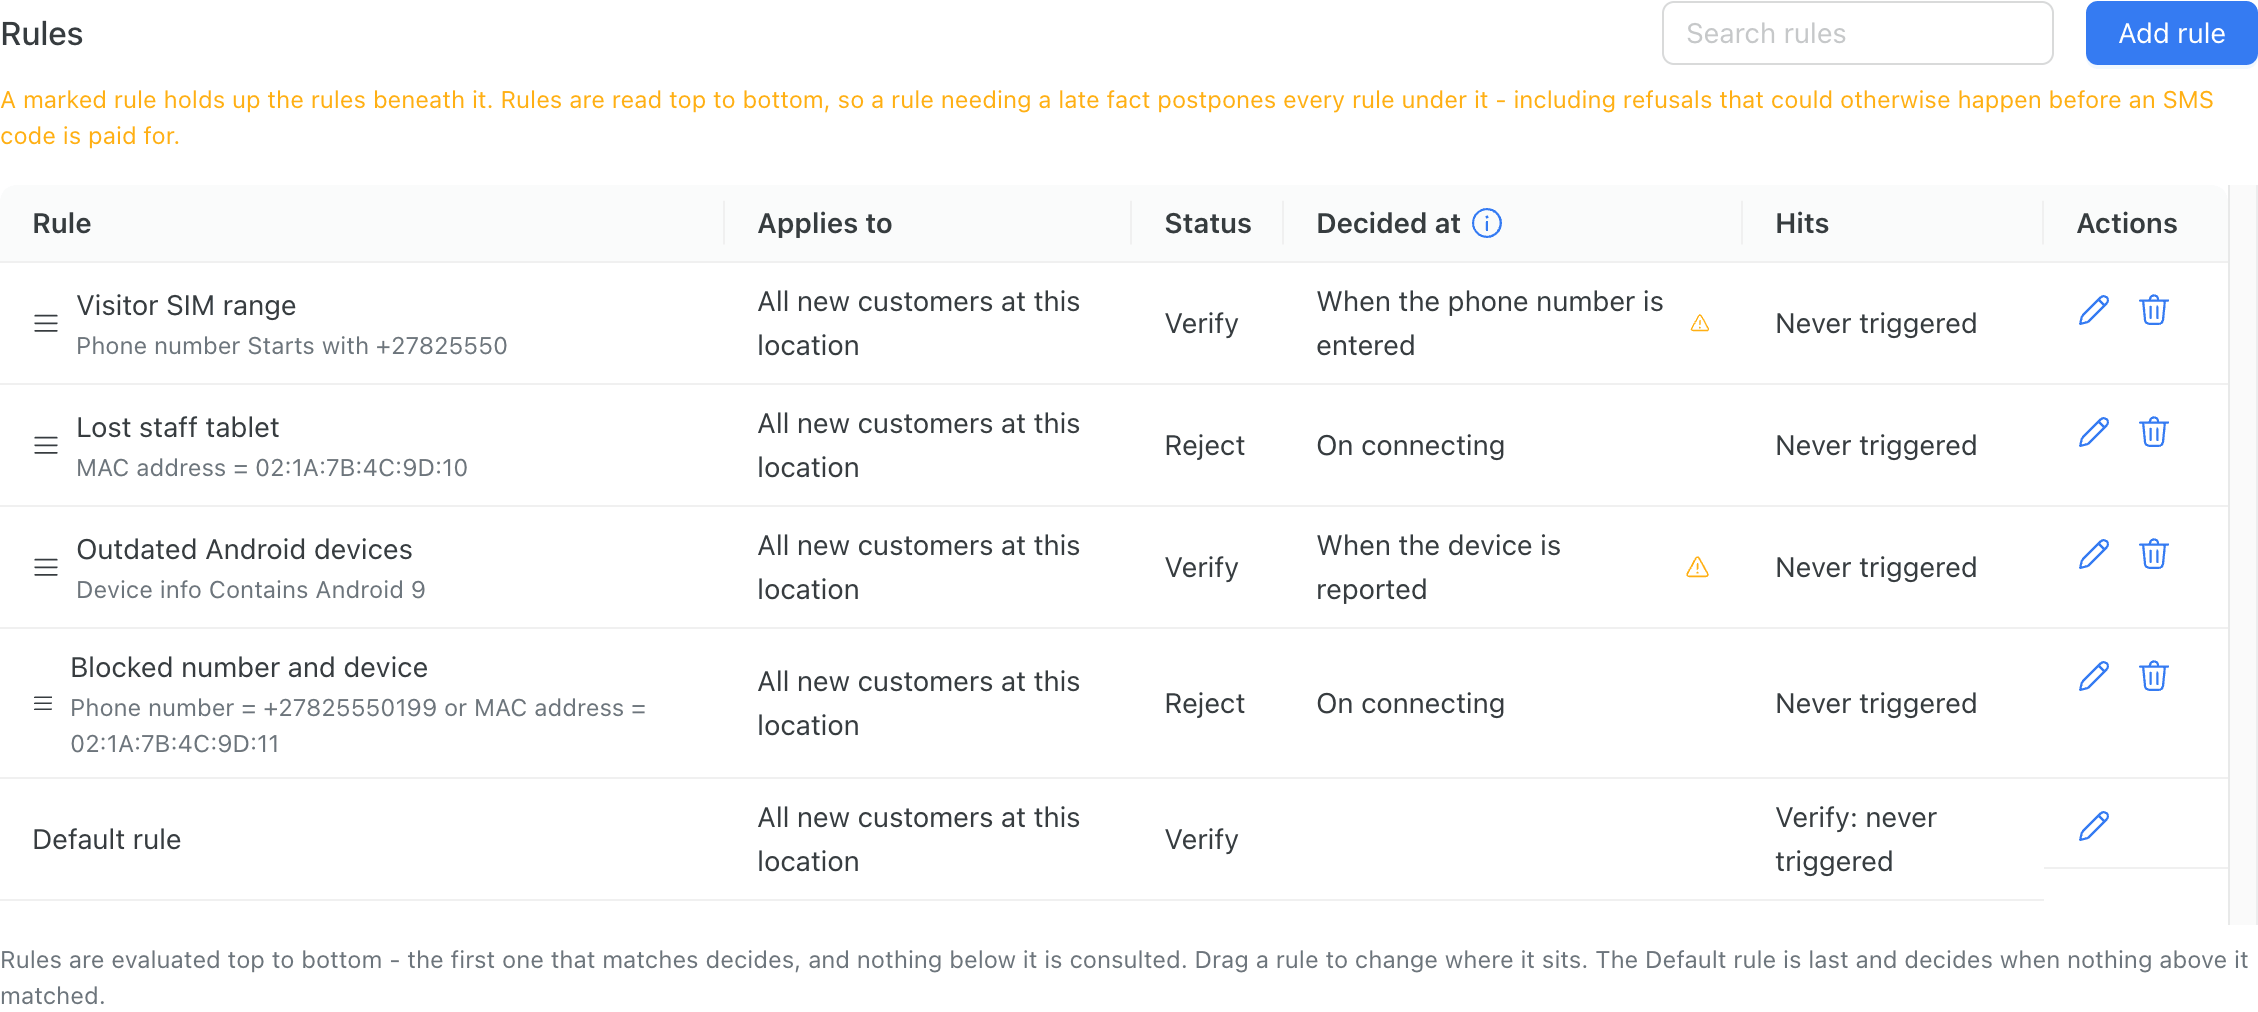
Rules are checked from top to bottom. The first rule that matches a user determines their outcome, nothing below it is evaluated. The Default rule always stays last.
Rule order matters because rules that match on the phone number or customer attributes can’t be evaluated until later in the connection process, while rules matching on MAC address run immediately, before the user even sees the splash page. If you want to refuse unwanted devices as early as possible, place MAC and device rules above rules that depend on the phone number.
Drag rules to reorder them. The list marks any rule that depends on a fact known only later in the process, so you can identify rules that will hold up evaluation of everything beneath them.
Step 5. Review the Approvals queue
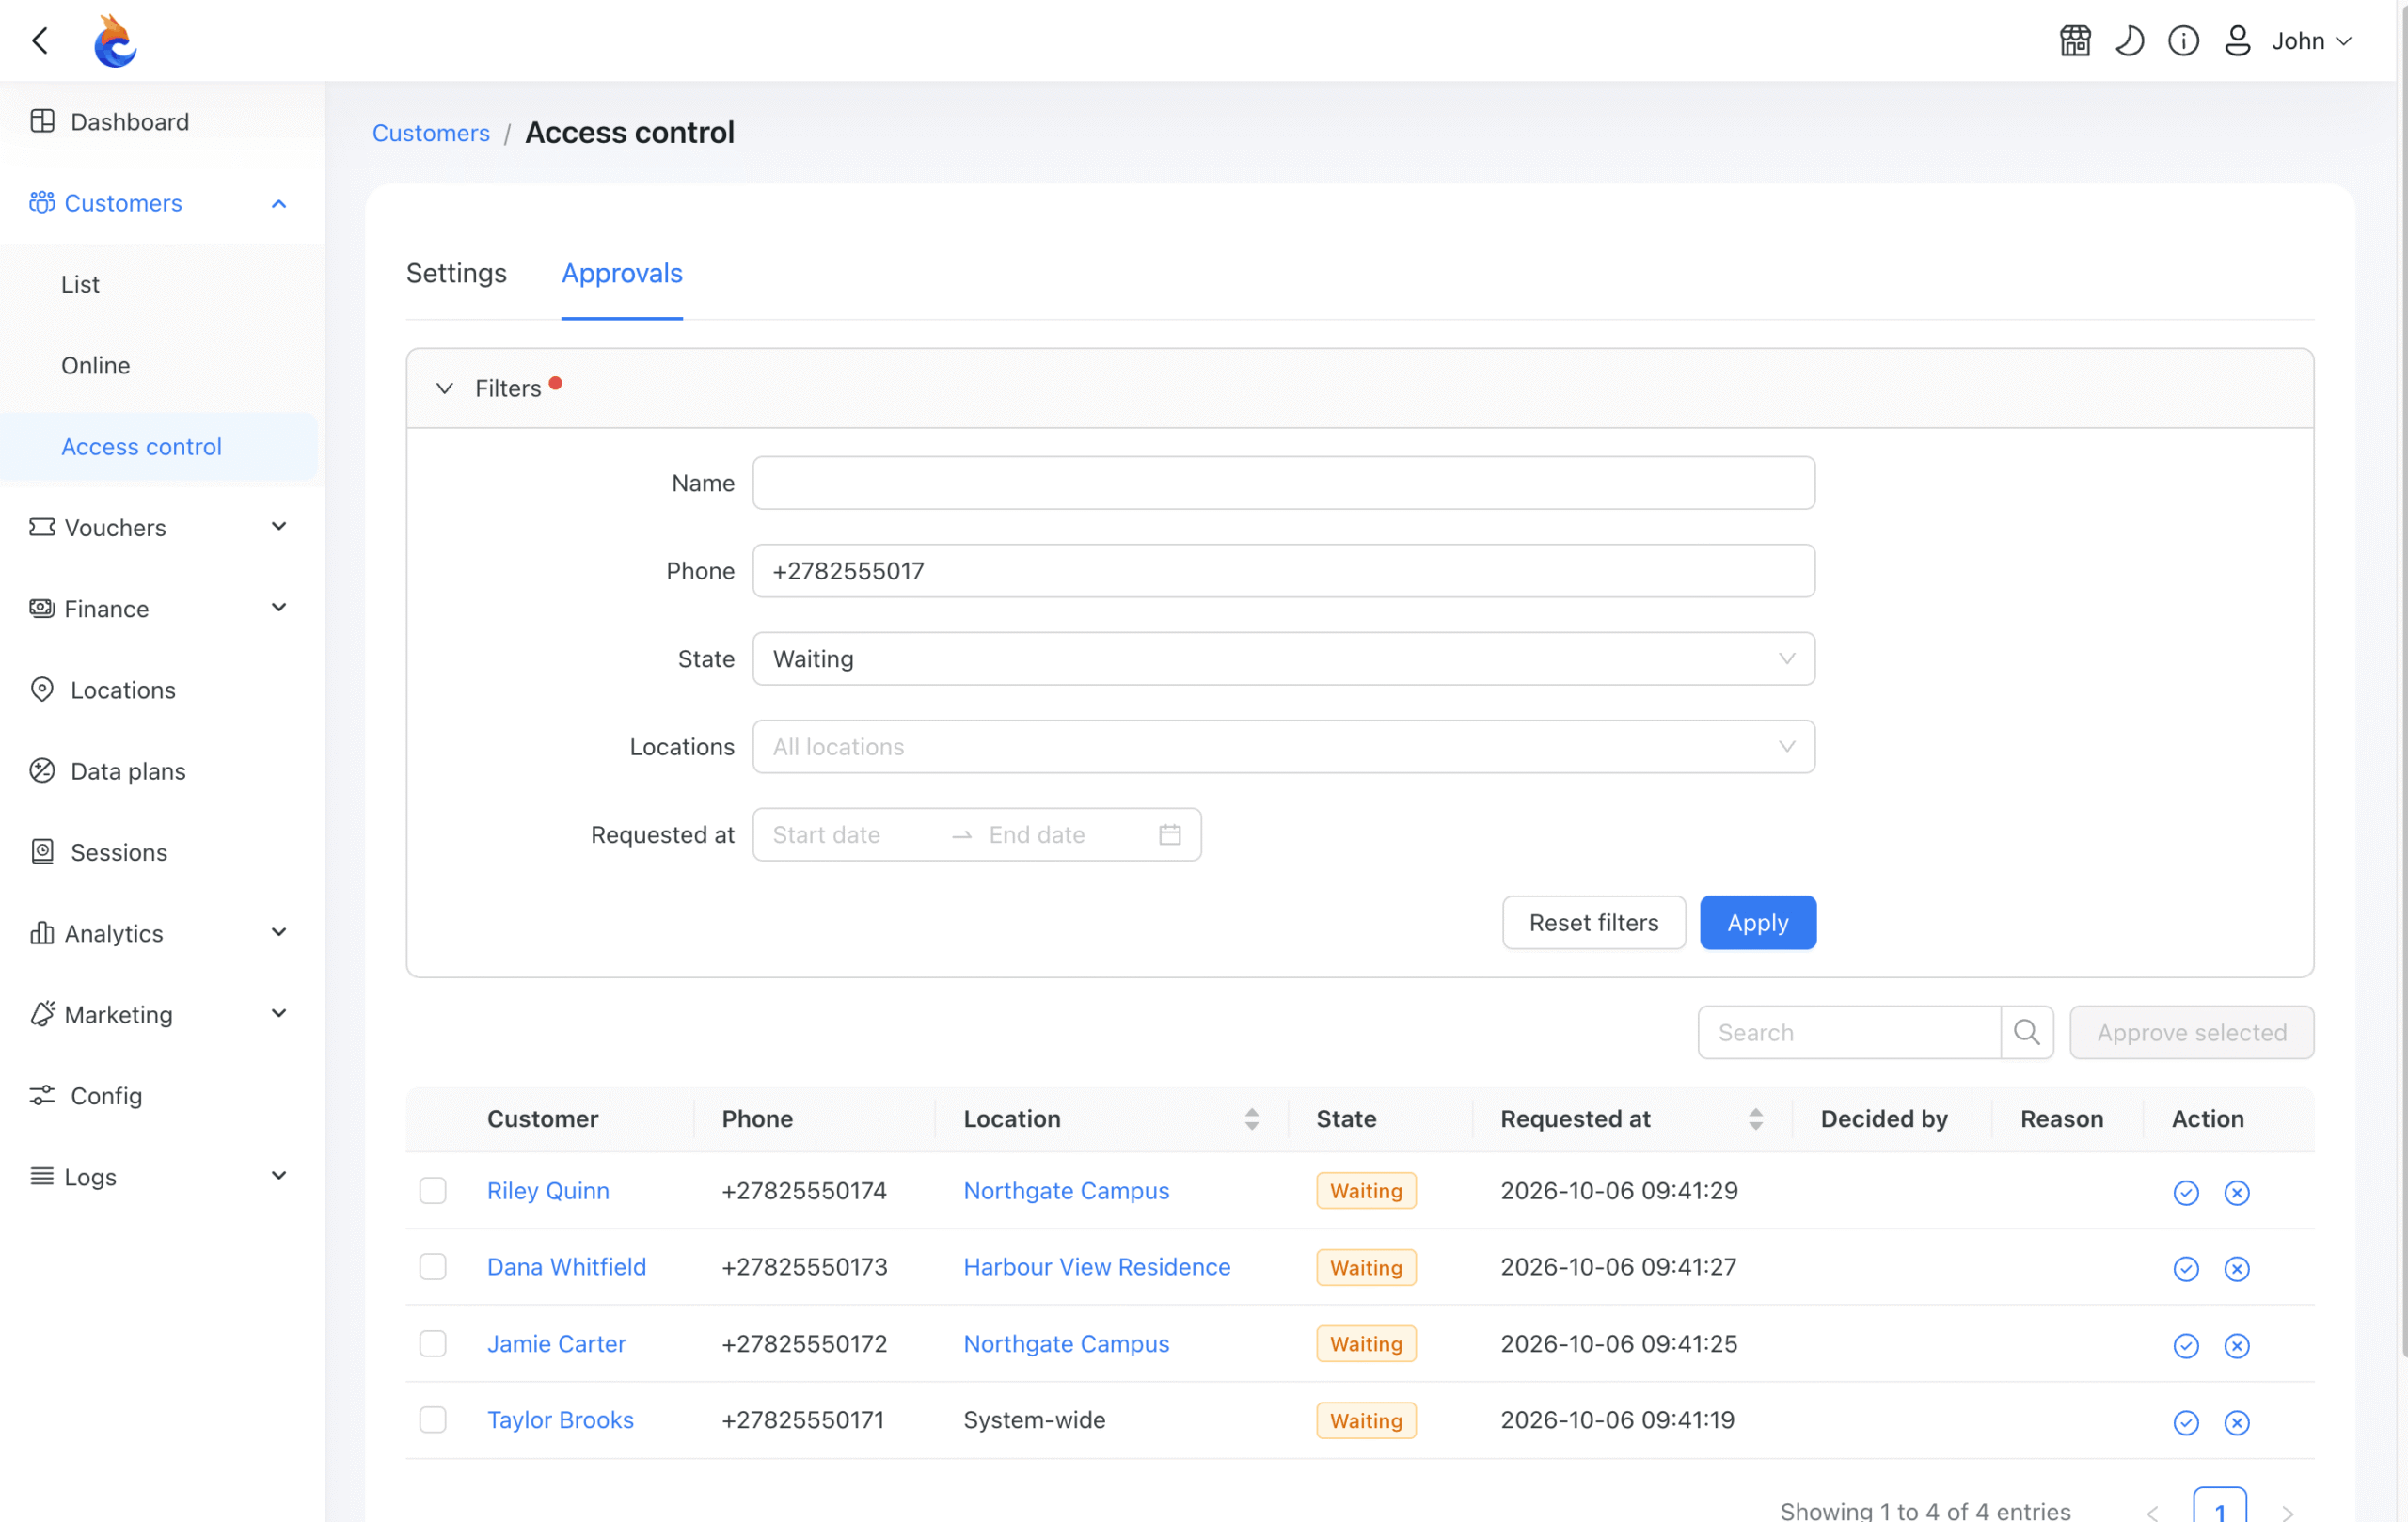
The Approvals tab at Customers → Access control lists everyone waiting for a decision, newest request first. A user appears once for each scope that holds them — the same person can have a separate entry for a specific location and for the system-wide policy if both require approval.
From each row:
- Approve – asks for confirmation and admits the customer at that scope;
- Reject – asks for a reason, which the customer sees on their waiting page;
- Approve selected – approves all checked rows at once. The result tells you if any were already decided or deleted in the meantime.
Use the State filter to switch between Waiting, Approved, Rejected, and All. The Locations filter includes System-wide, so you can find users held by the system-wide setting specifically.
A held user completes registration normally, then sees a waiting page rather than the data plans. They can’t choose a plan or enter a voucher code until they’re approved. If you reject them, the same page shows your rejection reason.
Note: Turning Verify off doesn’t release the queue. Users who were already waiting stay held until someone makes a decision about them. Approve them individually or use Approve selected to clear the queue.
Step 6. Manage individual customers
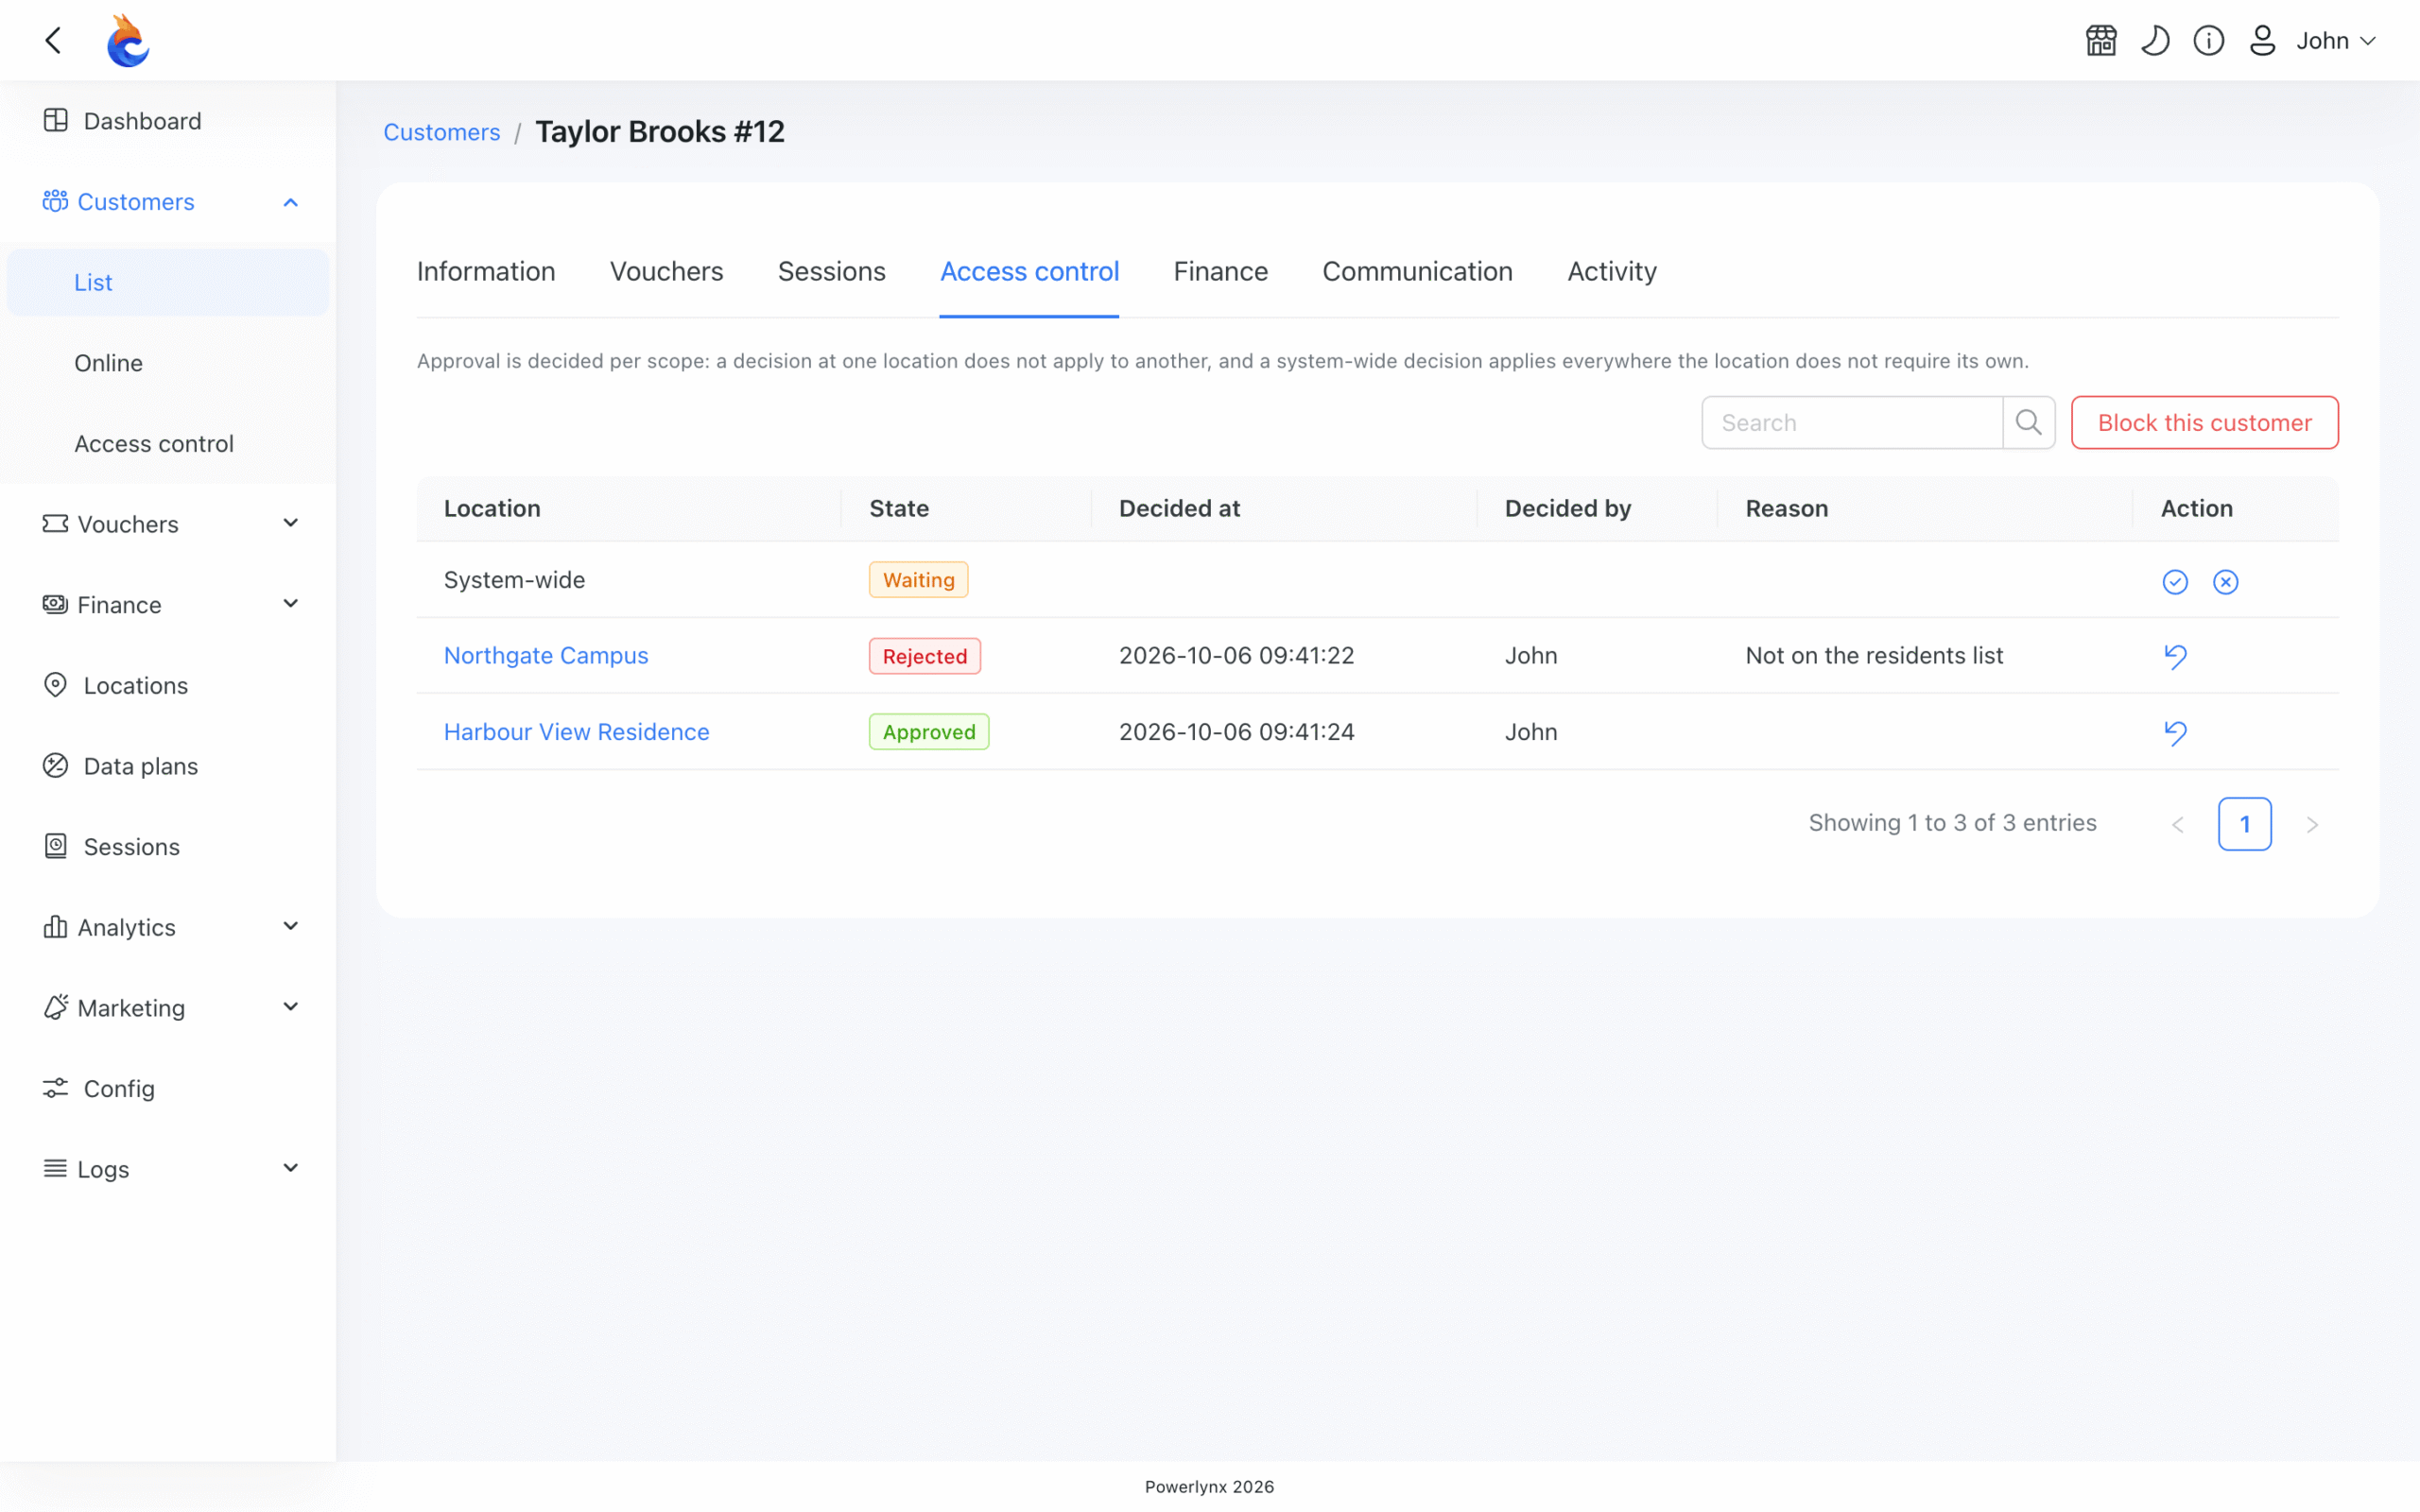
Open any customer record and switch to their Access control tab to see where they stand at every scope at once. Each row shows the current state, who made the decision, when, and any reason given.
Actions depend on the current state:
- Waiting – Approve or Reject;
- Approved – Revoke. The customer is held again on their next connection at that scope. A session already running is not cut off;
- Rejected – Return to waiting. The refusal and its reason are cleared, and the customer is held again on their next visit.
Block this customer, on the same tab, refuses one customer regardless of any other rules. In Block at, choose Default (system-wide) to refuse them everywhere, or pick a specific location to restrict the block to that site. The block carries over to their devices: a device linked to a blocked customer can’t be used to register again with a different phone number at that scope.
Warning: A valid voucher lets its holder through before access control is checked. Revoke, Reject, and Block will be refused while the customer holds a voucher that would admit them at that scope. The message lists the relevant vouchers. Disable them on the Vouchers screen first, then repeat the action. Powerlynx never disables a paid-for voucher automatically.
Step 7. Set an approval expiration period
Below the rules table, Auto-revoke period sets how many days an approval lasts. When it expires, the customer is held again on their next connection and must be approved again. Setting the value to 0 disables expiration.
A location can inherit the system-wide period, override it with its own number of days, or set 0 to disable expiration at that location only. Approvals only expire where approval is still required – switching a location back to Accept stops further holds there.
Practical use cases
University campus: manual approval before access
A university wants students and staff to be able to register, but doesn’t want the general public on the network automatically. Setting the Default rule to Verify at the relevant locations means every new user completes registration and then waits. Administrators work through the Approvals queue, check the provided details against the student or staff registry, and approve or reject accordingly.
Setting an Auto-revoke period of 180 or 365 days means approvals expire at the end of a semester or academic year. Returning users who are no longer enrolled go back into the queue on their next connection, where the administrator can make a fresh decision rather than inheriting one from a previous term.
Open hotspot: blocking fake phone number patterns
An ISP running open hotspots without SMS verification finds that some users register repeatedly with predictable fake numbers (strings of repeating digits like 5555555555 or sequential patterns) to get around data limits. An access rule can catch these before they get online.
Under Conditions, set the match to Phone number, choose Matches regex, and enter (\d)\1{5,}. This matches any number containing five or more identical consecutive digits. Set the Action to Reject and add a customer message directing them to register with a real number. Place this rule above the Accept Default rule, and it fires before anything is saved – no customer and device record.
Alternatively, use the Contains operator with multiple OR filters to block specific known patterns: numbers containing 000000, 111111, or 123456, for example. Both approaches work; the regex catches the pattern in one rule rather than maintaining a list.
Multi-location operator: different policies per site
An operator managing Wi-Fi across a mix of public venues, corporate offices, and a residential building can apply different policies without maintaining separate system configurations. The system-wide Default rule is Accept, covering the public locations. The corporate office location has its Default rule set to Verify, requiring approval. The residential building uses Verify with an Auto-revoke period tied to lease terms.
The Approvals tab’s Locations filter lets staff at each site work through their own queue without seeing others. An administrator with approval permission but not settings permission can process the queue without being able to change who lands in it — useful for delegating day-to-day approvals while keeping policy changes to senior staff.
Who benefits from Access Control
The clearest use cases are networks where open access is a problem: universities and student housing that need to verify enrollment, corporate networks that shouldn’t admit random passersby, and residential Wi-Fi where access should reflect who actually lives there. But it’s also useful on open commercial networks where fake registrations are a recurring issue.
Operators managing multiple locations benefit from the scope model: a single system-wide policy covers the common case, and per-location overrides handle exceptions without touching everything else. Teams benefit from the permission separation between changing policies and approving individual users.
In all of these situations, the feature gives administrators a mechanism to make access an explicit decision rather than a default. Not every network needs it — a coffee shop probably doesn’t, but for networks where the question of who’s online matters, the answer doesn’t have to be “everyone who registers.”
Powerlynx Access Control is available on all plans. Full documentation is at docs.powerlynx.app/system/access-control.html.