Wi-Fi hotspot setup doesn’t have to be hard. Here’s how to easily configure a Mikrotik router as a hotspot with Powerlynx in under five minutes.
When it’s finally time to configure wi-fi hotspot, there’s no need to panic. Whether you’ve switched internet service providers or you’ve simply decided to get something better and more reliable than whatever piece of plastic your ISP handed you, setting your router doesn’t have to be a headache. Here’s our easy-peasy guide on how to add a Mikrotik router as a hotspot in Powerlynx.
Powerlynx is a cloud-based platform that covers all aspects of Wi-Fi hotspot management (advanced analytics attached) and billing without costly server infrastructure or technical expertise. So setting up a MikroTik Hotspot with Powerlynx enhances your network’s functionality by adding secure and efficient management capabilities. This guide will walk you through the process from start to finish.
How to Configure a MikroTik Hotspot: Detailed Steps for Maximum Efficiency with Powerlynx Integration
Important: This is an advanced setup, so you must manually configure everything. Here is also a simple setup that generates a script to configure everything (hotspot server, RADIUS server, WireGuard connection, and other components) on your router.
Requirements
- MikroTik router with RouterOS
- Powerlynx account setup
- Basic knowledge of network configuration
- Access to WinBox or WebFig for MikroTik
Pre-Setup
If you have a new Mikrotik router, we highly recommend removing the preinstalled configuration with unnecessary settings by performing a Factory Reset. You’ll also need to update the most recent stable RouterOS firmware from the official Mikrotik site. In the case of a preconfigured router, it’s better to back up a current config. Go to Files > Backup to back up your current configs to the file and save it locally on your desktop.
Configuration Overview
- Step 1: Access Router
- Step 2: Configure WireGuard
- Step 3: Linking to Powerlynx
- Step 4: Adding IP Addresses
- Step 5: Configure Hotspot Server
- Step 6: Setup Radius Server
- Step 7: Adjust the Walled Garden
- Step 8: Finalizing the Hotspot Configuration
- Step 9: Powerlynx SSIDs
- Step 10: Verify and Test
Detailed Steps
- Accessing Your Router:
- Connect to your MikroTik router via WinBox or WebFig using administrator credentials.
- Configuring “WireGuard” for a more secure connection instead of the Public IP
- In the “Hotspots” section, add a new hotspot. Then, choose “WireGuard” as the connection type and generate the necessary keys. Please note, that the private key is only shown once. We recommend storing it somewhere in a safe place.
- Link router with Powerlynx:
- Under the WireGuard settings, input the configuration details from Powerlynx (images with necessary settings in the gallery).
- Copy and save the public key (always use this value —
lPYDyIwk5X4tyUMNT9ny/nyPSyHwk31mzm2ahOH7iV0=) for later use.
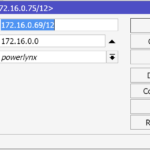
- Adding IP Addresses:
- Under IP -> Addresses create a new entry for WireGuard IP of your router.
- Ensure you assign the IP address to the correct interface to which the hotspot network’s switch or AP will connect.
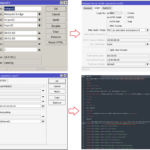
- Hotspot Server Configuration:
- Create a new Hotspot server under IP/Hotspot menu. The simplest way to set up a HotSpot server on a router is
/ip hotspot setupcommand. The router will ask to enter the parameters required to set up HotSpot successfully. - Use “MAC” for authorization and enable “Use Radius”.
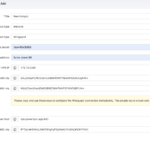
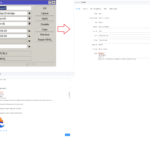
- To customize the login interface, replace the
login.htmlfile that can be found under the Files section with a special login.html file (click to download ). - There are only 2 points to change: highlighted values that need to be replaced with your Powerlynx URL, shown in the screenshot.
- Create a new Hotspot server under IP/Hotspot menu. The simplest way to set up a HotSpot server on a router is
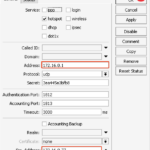
- Setting Up Radius Server:
- Configure a new Radius Server matching the Powerlynx specifications, ensuring the secret and source address align with what’s configured on Powerlynx.
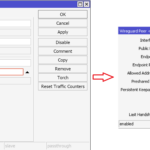
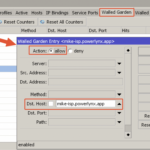
- Configuring Walled Garden:
- Add the Powerlynx URL and any necessary additional URLs. You would also need to add
*.digitaloceanspaces.comhost, as it is required to display the logos on the captive portal page. - You should also add additional Walled Garden hosts depending on what payment system you will use. The list of Walled Garden hosts to add to allow payment systems can be found in this post on our forum.
- Add the Powerlynx URL and any necessary additional URLs. You would also need to add
- Powerlynx SSIDs:
- It is crucial to add the hotspot server name from the router’s wireless settings (‘hotspot2’) into the Powerlynx SSID field under your location and under your splash page as shown on the screenshot. It’s not enough to add the hotspot server name only under Location details or only under the splash page details.
- Finalizing the Hotspot Configuration:
- Check the DHCP server settings to ensure your hotspot network is active.
- Testing and Verification:
- Connect to the hotspot and log in.
- Verify connectivity and functionality by accessing Powerlynx’s dashboard to see if the session is active and a new customer appears.
Screenshots
-
- Configure WireGuard on MikroTik
-
- Link router with Powerlynx
-
- Adding IP Addresses
-
- Hotspot Server Configuration
-
- Setting Up Radius Server
-
- Configuring Walled Garden
-
- Powerlynx SSID + Finalizing the Hotspot Configuration
MikroTik Hotspot Configuration Video: Step-by-Step Instructions
Troubleshooting Common Issues
- Connection Issues: Check WireGuard and Radius settings for accuracy.
- Hotspot Not Active: Ensure DHCP settings are correct and the server profile is configured correctly.
Conclusion
Integrating MikroTik with Powerlynx secures your network and provides a scalable management solution. Follow this guide to ensure a successful setup, and consult MikroTik’s and Powerlynx’s support for any specific issues. You can refer to the official MikroTik and Powerlynx forum for more detailed technical documentation.